#hyper-v powershell
Explore tagged Tumblr posts
Visit Tumblr Blog
Explore Tumblr blogs with no restrictions, modern design and the best experience.
Last Seen Tumblr Blogs


Fun Fact
Tumblr has a 66 index score for customer satisfaction in the US.
Text
Hyper-V Powershell Commands
Merhaba; bu yazımda sizlere çok popüler olan Hyper-V Powershell Commands konusundan bahsedeceğim. Günümüzde sanallaştırma platformalarını neredeyse tüm şirketler kullanmaktadır. Hyper-V de Microsoft’un bir sanallaştırma yazılımıdır. Burada sıklıkla kullanılan Powershell üzerinden yönetim komutlarını sizler için özetleyecğim. Hyper-V için PowerShell komutlarını detaylı olarak açıklayalım.…

View On WordPress
0 notes
Text
10 Must-Have PowerShell Scripts Every IT Admin Should Know
As an IT professional, your day is likely filled with repetitive tasks, tight deadlines, and constant demands for better performance. That’s why automation isn’t just helpful—it’s essential. I’m Mezba Uddin, a Microsoft MVP and MCT, and I built Mr Microsoft to help IT admins like you work smarter with automation, not harder. From Microsoft 365 automation to infrastructure monitoring and PowerShell scripting, I’ve shared practical solutions that are used in real-world environments. This article dives into ten of the most useful PowerShell scripts for IT admins, complete with automation examples and practical use cases that will boost productivity, reduce errors, and save countless hours.
Whether you're new to scripting or looking to optimize your stack, these scripts are game-changers.
Automate Active Directory User Creation
Provisioning new users manually can lead to errors and wasted time. One of the most widely used PowerShell scripts for IT admins is an automated Active Directory user creation script. This script allows you to import user details from a CSV file and automatically create AD accounts, set passwords, assign groups, and configure properties—all in a few seconds. It’s a perfect way to speed up onboarding in large organizations. On MrMicrosoft.com, you’ll find a complete walkthrough and customizable script templates to fit your unique IT environment. Whether you're managing 10 users or 1,000, this script will become one of your most trusted tools for Active Directory administration.
Bulk Assign Microsoft 365 Licenses
In hybrid or cloud environments, managing Microsoft 365 license assignments manually is a drain on time and accuracy. Through Microsoft 365 automation, you can use a PowerShell script to assign licenses in bulk, deactivate unused ones, and even schedule regular audits. This script is a great way to enforce licensing compliance while reducing costs. At Mr Microsoft, I provide an optimized version of this script that’s suitable for large enterprise environments. It’s customizable, secure, and a great example of how scripting can eliminate repetitive administrative tasks while ensuring your Microsoft 365 deployment runs smoothly and efficiently.
Send Password Expiry Notifications Automatically
One of the most common helpdesk tickets? Password expiry. Through simple IT infrastructure automation, a PowerShell script can send automatic email notifications to users whose passwords are about to expire. It reduces last-minute password reset requests and keeps users informed. At Mr Microsoft, I share a plug-and-play script for this task, including options to adjust frequency, messaging, and groups. It’s a lightweight, server-friendly way to keep your user base informed and proactive. With this script running on a schedule, your IT team will have fewer disruptions and more time to focus on high-priority tasks.
Monitor Server Disk Space Remotely
Monitoring disk space across multiple servers—especially in hybrid cloud environments—can be difficult without the right tools. That’s why cloud automation for IT pros includes disk monitoring scripts that remotely scan storage, trigger alerts, and generate reports. I’ve posted a working solution on Mr Microsoft that connects securely to servers, logs thresholds, and sends alerts before critical levels are hit. It’s ideal for IT teams managing Azure resources, Hyper-V, or even on-premises file servers. With this script, you can detect space issues early and prevent downtime caused by full partitions.
Export Microsoft 365 Mailbox Size Reports
For admins managing Exchange Online, mailbox size tracking is essential. With the right Microsoft 365 management tools, like a PowerShell mailbox report script, you can quickly extract user sizes, quotas, and growth over time. This is invaluable for storage planning and policy enforcement. On Mr Microsoft, I’ve shared an easy-to-adapt script that pulls all mailbox data and exports it to CSV or Excel formats. You can automate it weekly, track long-term trends, or email the results to managers. It’s a simple but powerful reporting tool that turns Microsoft 365 data into actionable insights.
Parse and Report on Windows Event Logs
If you’re getting started with scripting, working with event logs is a fantastic entry point. Using PowerShell for beginners, you can write scripts that parse Windows logs to identify system crashes, login failures, or security events. I’ve built a script on Mr Microsoft that scans logs daily and sends summary reports. It’s lightweight, customizable, and useful for security monitoring. This is a perfect project for IT pros new to scripting who want meaningful results without complexity. With scheduled execution, this tool ensures proactive monitoring—especially critical in regulated or high-security environments.
Reset Passwords for Multiple Users
Resetting passwords one at a time is inefficient—especially during mass onboarding, offboarding, or policy enforcement. Using IT admin productivity tools like a PowerShell batch password reset script can streamline the process. It’s secure, scriptable, and ideal for both on-premises AD and hybrid Azure AD environments. With added functionality like expiration dates and enforced resets at next login, this script empowers IT admins to enforce password policies with speed and consistency.
Automate Windows Update Scheduling
If you’re tired of unpredictable updates or user complaints about restarts, this is for you. One of the most effective PowerShell scripts for IT admins automates the installation of Windows updates across workstations or servers. With this tool, you can check for updates, install them silently, and even reboot during off-hours. This reduces patching delays, improves compliance, and eliminates the need for manual updates or GPO complexity—especially useful in remote or hybrid work environments.
Cleanup Inactive Users with Graph API
Inactive user accounts are a security risk and resource drain. With the Microsoft Graph API, you can automate account cleanup based on login activity or license usage. My detailed Microsoft Graph API tutorial on Mr Microsoft walks through how to connect securely, pull activity data, and disable or archive stale accounts. This not only tightens security but also saves licensing costs. It’s a must-have script for admins managing large Microsoft 365 environments. Plus, the tutorial includes reusable templates to make your deployment faster and safer.
Automate SharePoint Site Provisioning
Provisioning SharePoint sites manually is tedious and error-prone. With Microsoft 365 automation, you can instantly create SharePoint sites based on predefined templates, permissions, and naming conventions. I’ve built a reusable script on Mr Microsoft that automates this entire process. It’s ideal for departments, projects, or onboarding flows where consistency and speed are critical. This script integrates with Teams and Exchange setups too, giving your IT team a full-stack provisioning workflow with minimal effort.
Final Thoughts – Automate Smarter, Not Harder
Every script above is built from real-life IT challenges I’ve encountered over the years. At Mr Microsoft, my goal is to share solutions that are practical, secure, and ready to use. Whether you're managing hundreds of users or optimizing workflows, automation is your edge—and PowerShell scripts for IT admins are your toolkit. Want more step-by-step guides and tools built by a fellow IT pro?
Visit MrMicrosoft.com and start automating smarter today.
1 note
·
View note
Text
How to uninstall Hyper-V on a Windows PC
In the last article, we discussed how to “Run Hype-V on Windows 11 and Install Windows OS via PXE Boot“. This can be done in many ways including using the Windows control panel, PowerShell or using the Deployment Imaging Servicing and Management tool (DISM). But in this article, we shall discuss How to uninstall Hyper-V on a Windows PC. Please see how to fix “An error occurred while attempting to…
0 notes
Text
Quản Trị Windows Server: Tối Ưu Hóa Hệ Thống Và Bảo Mật Hiệu Quả
Với sự phát triển không ngừng của công nghệ, các hệ thống máy chủ (server) ngày càng đóng vai trò quan trọng trong việc duy trì và vận hành các hoạt động của doanh nghiệp. Trong đó, Windows Server là một trong những nền tảng được sử dụng phổ biến nhất. Quản trị Windows Server đòi hỏi không chỉ kiến thức kỹ thuật mà còn sự hiểu biết sâu sắc về các công cụ hỗ trợ để đảm bảo hệ thống hoạt động mượt mà, an toàn và hiệu quả.
Windows Server Là Gì?
Windows Server là một dòng hệ điều hành máy chủ do Microsoft phát triển, được thiết kế để cung cấp các dịch vụ như quản lý người dùng, lưu trữ dữ liệu, và quản lý mạng cho các doanh nghiệp. Nó cung cấp một nền tảng mạnh mẽ và linh hoạt, hỗ trợ nhiều công nghệ và dịch vụ khác nhau, từ cơ bản như DNS, DHCP đến nâng cao như Active Directory và Hyper-V.
Nhiệm Vụ Chính Của Việc Quản Trị Windows Server
Quản trị Windows Server bao gồm nhiều nhiệm vụ quan trọng, từ việc cài đặt, cấu hình hệ thống đến bảo trì và bảo mật dữ liệu. Dưới đây là một số nhiệm vụ chính mà một quản trị viên Windows Server cần thực hiện:
Cài Đặt và Cấu Hình Server: Quản trị viên cần cài đặt và cấu hình các dịch vụ cơ bản như DNS, DHCP, và Active Directory để đảm bảo hệ thống hoạt động đúng chức năng.
Quản Lý Người Dùng và Quyền Truy Cập: Sử dụng Active Directory, quản trị viên có thể quản lý tài khoản người dùng, nhóm, và quyền truy cập, đảm bảo rằng chỉ những người có quyền mới được truy cập vào các tài nguyên quan trọng.
Sao Lưu và Khôi Phục Dữ Liệu: Đảm bảo rằng dữ liệu của doanh nghiệp được sao lưu thường xuyên và có thể khôi phục nhanh chóng trong trường hợp sự cố là nhiệm vụ quan trọng của quản trị viên.
Giám Sát và Tối Ưu Hóa Hiệu Suất: Quản trị viên cần liên tục giám sát hiệu suất của server để phát hiện sớm các vấn đề tiềm ẩn và tối ưu hóa tài nguyên để hệ thống luôn hoạt động hiệu quả.
Bảo Mật Hệ Thống: Đảm bảo hệ thống an toàn trước các cuộc tấn công mạng bằng cách cập nhật các bản vá bảo mật, sử dụng tường lửa và phần mềm diệt virus.
Các Công Cụ Hỗ Trợ Quản Trị Windows Server
Việc quản trị Windows Server sẽ trở nên dễ dàng và hiệu quả hơn khi sử dụng các công cụ hỗ trợ phù hợp. Dưới đây là một số công cụ quan trọng mà mọi quản trị viên cần nắm rõ:
Active Directory (AD): Là công cụ chính để quản lý tài khoản người dùng, máy tính, và các tài nguyên mạng khác. AD giúp quản trị viên kiểm soát và phân quyền truy cập trong hệ thống.
PowerShell: Công cụ dòng lệnh này cho phép quản trị viên thực hiện các tác vụ quản trị phức tạp một cách tự động và nhanh chóng. PowerShell đặc biệt hữu ích trong việc quản lý hệ thống lớn với nhiều server và tài nguyên.
Windows Admin Center: Cung cấp giao diện quản lý web thân thiện, cho phép quản trị viên quản lý server từ xa và thực hiện các tác vụ như cập nhật phần mềm, quản lý lưu trữ và giám sát hiệu suất.
System Center Configuration Manager (SCCM): Công cụ quản lý hệ thống mạnh mẽ này cho phép triển khai, cập nhật và quản lý phần mềm, hệ điều hành trên quy mô lớn. SCCM giúp tối ưu hóa việc quản lý các máy tính và server trong mạng.
Hyper-V: Đây là công cụ ảo hóa tích hợp trong Windows Server, cho phép tạo và quản lý các máy ảo, giúp tận dụng tối đa tài nguyên phần cứng và giảm chi phí.
Tối Ưu Hóa Và Bảo Mật Trong Quản Trị Windows Server
Một trong những thách thức lớn nhất trong quản trị Windows Server là đảm bảo hệ thống luôn hoạt động ổn định và an toàn. Dưới đây là một số phương pháp giúp tối ưu hóa và bảo mật hệ thống:
Tối Ưu Hóa Hiệu Suất: Quản trị viên nên thường xuyên kiểm tra và tối ưu hóa các dịch vụ đang chạy trên server. Sử dụng các công cụ giám sát như Performance Monitor để theo dõi hiệu suất và phát hiện các vấn đề tiềm ẩn.
Cập Nhật Thường Xuyên: Việc cập nhật hệ điều hành và các phần mềm liên quan là rất quan trọng để bảo vệ hệ thống khỏi các lỗ hổng bảo mật. Quản trị viên nên thiết lập lịch trình cập nhật và kiểm tra thường xuyên để đảm bảo hệ thống luôn được bảo vệ tốt nhất.
Bảo Mật Đa Lớp: Sử dụng tường lửa, phần mềm diệt virus, và các công cụ giám sát mạng để bảo vệ hệ thống khỏi các cuộc tấn công từ bên ngoài. Quản trị viên cũng nên thực hiện kiểm tra bảo mật định kỳ để phát hiện và khắc phục các điểm yếu trong hệ thống.
Sao Lưu Và Khôi Phục: Đảm bảo rằng dữ liệu quan trọng của doanh nghiệp được sao lưu thường xuyên và có sẵn các phương án khôi phục trong trường hợp sự cố. Sử dụng các công cụ như Windows Server Backup để tự động hóa quá trình sao lưu.
Kết Luận
Quản trị Windows Server không chỉ là việc duy trì hệ thống hoạt động ổn định, mà còn là đảm bảo an toàn và tối ưu hóa hiệu suất cho doanh nghiệp. Sử dụng các công cụ hỗ trợ phù hợp, cùng với kiến thức chuyên sâu về hệ điều hành, quản trị viên có thể đảm bảo rằng hệ thống luôn hoạt động mượt mà và bảo mật cao. Việc đầu tư vào quản trị Windows Server là một bước quan trọng để doanh nghiệp phát triển bền vững trong môi trường kinh doanh đầy cạnh tranh hiện nay.
Tìm hiểu thêm: https://vndata.vn/windows-server/
0 notes
Text
Linux Life Episode 84

Hello everybody and welcome back to Linux Life I admit its been a little while since I made an entry which was informing you of the death of Mangelwurzel and entry of the new Dell Inspiron 3525 I am currently using to type this article on.
Reason its been so long was I actually went back to Windows (stop spitting at back please it’s not pretty) because I wanted to play Blur and a few other games. Well I did and in that time I also tried several ways to have a Linux installation in some form of VM.
So first I used Virtualbox which is a Type 2 Hypervisor basically what that means is everything is emulated in its own little sandbox and all the hardware is virtual. I did manage to get Ubuntu Studio running but to say it was rough would be an understatement.
Virtualbox does not like KDE to say the least and it was painful to run. Also the networking was slow. Sure I could have used normal Ubuntu to see if GNOME was faster but for all I have tried it many times I really don’t like GNOME. Everything needs extensions and the interface is horrible.
Finding apps requires typing in a search because of that stupid Mac Launchpad icon design. I really detest it. I’m sure if you were using a touchscreen then it makes sense but most laptops definitely are not.
Anyway after far too many hours wasted with that I moved on to try Hyper V which is a Type 1 Hypervisor which allows much more connection to base metal components... it lets you use your actual graphics card, the hard drive can be accessed better and you have access to USB and the likes which makes it much better.
Now at the time I was using Windows 11 Home as that’s what came pre-installed on the Dell. So I had to download Hyper V as it wasn’t there by default. So first I try Ubuntu as Canonical have an agreement with Microsoft due to WSL.
Sure enough it installed and was pretty fluid but it had no sound. There was an enhanced mode which refused to work as to do so it needed RDS (Remote Desktop Support) which also prevented sound from working (Huh ?).
To get RDS you need Windows 11 Pro which Microsoft informed me if I wanted a key would be £119. Hmmm not happy obliterated Ubuntu VM. Went web-side got a Windows 11 Pro for £1.67 as it was OEM key. They key would have been £3.35 but I found a 50% off code.
After a bit of fiddling I got Windows 11 Home to go to Pro using a key to switch it then once it did that registered the new OEM key and it worked and guess what I have access to Remote Desktop Services.
So as I felt that Hyper V could cope I now tried installing EndeavourOS which installed without a single hitch. I admit the network was slow but a million times quicker than Virtualbox.
It had no issues with KDE whatsoever but once again no sound. I installed several Hyper V tools and things from the AUR. Even changed out pipewire back to pulseaudio but no matter what I did, sod all worked. RDS couldn’t see the VM even including doing the various Powershell tips.
Bugger all, now sure I could have run Endeavour without sound but I had come this far damn it. OK deleted VM. OK I now have Win 11 Pro so lets try the Ubuntu stuff again.
OK now enhanced mode shows a dialogue and when I log in screen goes black and bugger all happens. Click off enhanced mode and Ubuntu is working. Enhanced mode just black. Setup Ubuntu. reboot now enhanced mode doesn’t come up and even the VM crashes now.
This wasted too many hours and days of messing around. I even got the RDS side running but when I tried to Remotely Access using RDS it crashed. What a complete waste of bloody time.
I even tried running a Ubuntu Studio VM using VMWare Player 17. It didn’t work.
I doing think about setting up a KVM version of QEMU to run a Linux installation but guess what if you want sound on QEMU you need to get a specific version called the Screamer and it won’t let you use KVM setup meaning it wouldn’t allow you to install the Linux.
By this point I just gave up I honestly don’t care what type of Hypervisor it is I am obviously too thick to get things running as they should and I gave up.
I almost tried Proxmox and XCP-NG but upon seeing what they entailed just gave up.
After all that I thought I would leave alone and just use Windows. Then everyone started informing my Facebook had been cloned, well lets just say that didn’t happen when I had Linux.
The internet under Windows just ran slower than when I had Linux. Watching YouTube stalled regularly, downloads failed due to time out and my frustration levels were getting to breaking point.
I tried to dual boot Linux as I found out how to shrink the partition in Windows and use it for Linux installation. So tried EndeavourOS but because of the Secure boot it wouldn’t let the system install.
However for some reason Fedora will install if Secure boot is still on. So I installed Fedora Beta 40 because I wanted to try the new KDE Plasma 6. Now I know it’s beta software so not to have many expectations but most of the software I use was not in the store nor could I find the appropriate dnf installer.
However Fedora now would boot but my Windows 11 wouldn’t the partition was there but it didn’t add it to the menu so now I could load Fedora but Windows wouldn’t load.
Tried OS Prober, Grub Customizer, no matter what I did could not get the Windows 11 partition to boot or get it in the options
Pissed off now I finally turned off Secure boot. Wiped the whole hard drive and installed EndeavourOS Galileo Neo (the latest version) and set up the Dell with KDE.
It now is running on KDE 6 Plasma 6.0.2 running Wayland. It is running seamlessly, the internet is quicker. No issues with YouTube. Updating fine. When I tried KDE 5 Plasma Wayland, Steam and several other programs stopped working.
Well Steam is working fine using XWayland (a Wayland to X11 bridge) and there is a version of Cairo Dock that works with Wayland (it is experimental but so far has not died on me).
So all is right with the world in that respect. Only issue is screen capture isn’t great in Wayland but someone is working on it. OBS and other video capture work fine but screen capture programs such Flameshot, Shutter and other need work.
Well Wayland is slowly being adapted so in time I am sure these things will be fixed over the next few months as more and more main distros seem to be moving to Wayland.
It works well enough and to be honest it's even faster for program launch it seems than the original X11 which is now over twenty years old.
I am yet to try the Steam Proton games such as Path of Exile but who knows maybe next time we speak I may have done so.
So with all that madness abound I bid you farewell for this episode.
Hopefully I will try not to break anything major... until next time take care.
#linux life#ubuntu#ubuntu studio#virtualization#virtual machines#hyper v#virtualbox#wayland#x11#waffle#steam
1 note
·
View note
Text
The Essential Guide to Windows Server: Unveiling the Power of Microsoft's Robust Operating System
In the realm of enterprise-level computing, Windows Server stands as a stalwart, serving as the backbone for countless organizations worldwide. Microsoft's Windows Server is a powerful operating system designed specifically to meet the demanding needs of businesses, providing a robust platform for running applications, managing network infrastructure, and ensuring data security. In this article, we will explore the key features, functionalities, and benefits of Windows Server, shedding light on why it remains a preferred choice for businesses across diverse industries.
Foundation of Windows Server:
Windows Server is built upon the same core architecture as its desktop counterpart, Windows 10. However, it is enhanced with additional features and capabilities specifically tailored to the requirements of server environments. These include advanced networking functions, robust security measures, and scalability options that make it suitable for a wide range of applications.
Server Roles and Features:
One of the defining aspects of Windows Server is its flexibility in adapting to various roles within an IT infrastructure. Through the installation of specific server roles and features, organizations can customize their server environment to meet specific needs. Whether it's acting as a domain controller, file server, web server, or virtualization host, Windows Server excels in its adaptability.
Active Directory:
At the heart of Windows Server's identity and access management capabilities is Active Directory. This centralized authentication and authorization service play a pivotal role in managing user accounts, permissions, and network resources. Active Directory simplifies the administration of large networks and ensures a secure and organized IT environment.
Virtualization with Hyper-V:
Windows Server incorporates Hyper-V, Microsoft's hypervisor-based virtualization platform. Hyper-V enables organizations to create and manage virtual machines (VMs), facilitating server consolidation, resource optimization, and improved scalability. This virtualization solution is a cornerstone for modern data centers seeking efficiency and flexibility.
Security Measures:
In the constantly evolving landscape of cybersecurity threats, Windows Server has fortified its defenses. Features such as Windows Defender, BitLocker, and Credential Guard work in tandem to safeguard servers and data against malicious activities. Regular security updates and patches are part of Microsoft's commitment to keeping Windows Server resilient against emerging threats.
Scalability and Performance:
As businesses grow, their IT infrastructure must evolve accordingly. Windows Server addresses this need by providing scalability options that allow organizations to expand their resources seamlessly. Whether it's adding more servers to a network, scaling up virtual machines, or enhancing storage capacity, Windows Server adapts to the changing demands of a dynamic business environment.
Integration with Cloud Services:
Recognizing the importance of cloud computing, Microsoft has integrated Windows Server with its Azure cloud platform. This integration facilitates hybrid cloud deployments, enabling organizations to leverage the benefits of both on-premises and cloud-based solutions. This hybrid approach provides flexibility, scalability, and cost-effectiveness.
User Interface and Management:
Windows Server offers a user-friendly interface for administrators to manage and monitor server functions. The Server Manager console provides a centralized location for configuring server roles, features, and system settings. Additionally, PowerShell, Microsoft's scripting language, allows for efficient automation and management of tasks.
Conclusion:
Windows Server continues to play a pivotal role in the IT infrastructure of businesses worldwide, offering a comprehensive solution for diverse server-related needs. Its versatility, security features, and integration with cloud services make it an indispensable tool for organizations striving to maintain a reliable, scalable, and secure IT environment. As technology evolves, Windows Server is poised to adapt and remain a cornerstone for businesses seeking a robust and efficient server operating system.
1 note
·
View note
Text
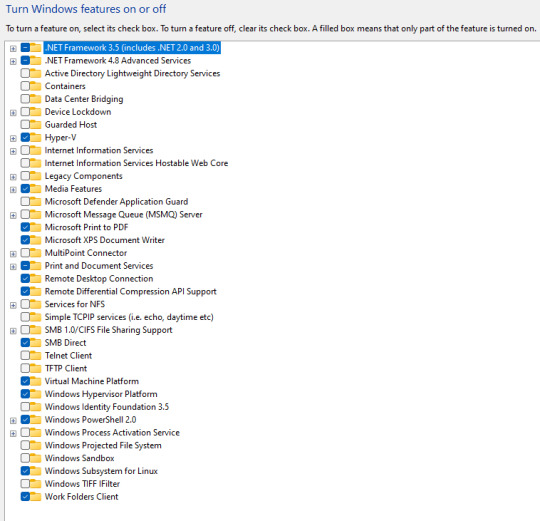
Add Lixus terminal in Windows
Enable the below feature from the start>> Windows features HYPER-V Remote desktop connection Virtual Machine Platform Windows Hypervisor Platform Windows Powershell 2.0 Windows Subsystem for Linux Now GO to Microsoft Store>> download and install the below applicationsTerminal and Ubuntu’s latest version of LTS (for ex.Ubuntu 22.04.3 LTS)Open the terminal and select Ubuntu from the…
View On WordPress
0 notes
Text
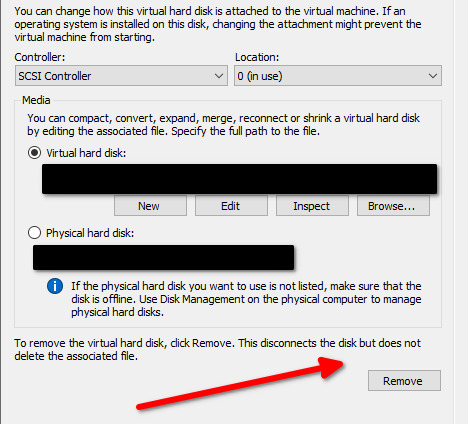
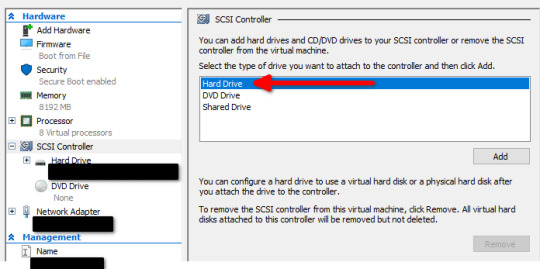
How to perform storage migration in a Hyper-V failover cluster
Case
You have a Hyper-V cluster and you need to migrate virtual machine disk files and other disk-based clustered objects (such as paging files and snapshots) from an old storage repository to a new storage repository. This could mean migration between storage LUNs of the same storage system or between storage LUNs of different storage systems which are attached to the same hypervisor cluster. The migrated virtual machine disks may be of type .vhd, .vhdx, .vhdx shared or .vhds (VHD Set).
Solution
For best practice designs of Hyper-V clusters, you should review the following article: https://stefanos.cloud/kb/how-to-deploy-a-hyper-v-cluster-with-powershell/. Also you can purchase my e-book on Hyper-V cluster design best practices. https://stefanos.cloud/blog/windows-failover-clustering-design-handbook/ To migrate virtual machine storage, you should use the Hyper-V cluster storage migration feature. Via Failover Cluster Manager Follow the steps below in the Failover Cluster Manager console. - Open the Hyper-V cluster manager console and click on the VM whose storage you need to migrate between cluster disks (volumes). Right-click on the VM and choose command "Move --> Virtual Machine Storage".

On the upper section, choose either the entire source VM or some of the associated storage files which you wish to migrate (source). Then drag and drop the selected rows to the lower section into the target folder of the target cluster volume (target). After completing the drag and drop operation, you should see a summary of the before (source) and after (target) storage repository for the dragged storage entities, as shown in the example below.
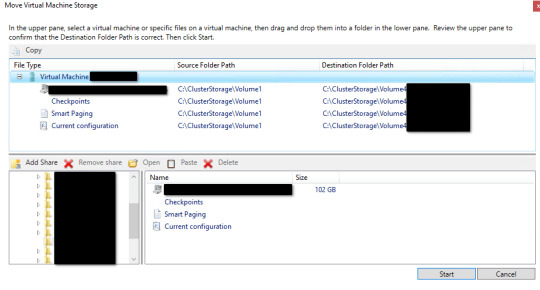
When you are ready click "Start" and observe the storage migration status in the Failover Cluster Manager console as well as by observing network traffic in the Windows File Explorer, from the source storage volume to the target volume. The storage migration initiation should be shown inside the Failover Cluster Manager, next to the VM record whose storage migration has started.

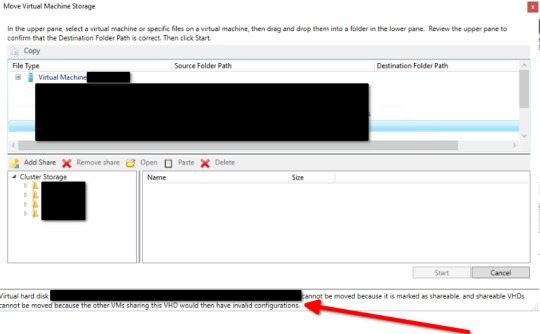
You should repeat the above steps for all virtual machines whose storage you wish to migrate. Via Powershell You can achieve the same Hyper-V virtual machine storage migration with the following example Powershell cmdlet. Move-VMStorage "SourceVM" -VirtualMachinePath D:MyVMsConfig -SnapshotFilePath D:MyVMsSnapshots -SmartPagingFilePath D:MyVMsSmartPaging -VHDs @(@{"SourceFilePath" = "C:MyVMsDisk1.VHDX"; "DestinationFilePath" = "D:MyVMsDisksDisk1.VHDX"}, @{"SourceFilePath" = "C:MyVMsDisk2.VHDX"; "DestinationFilePath" = "D:MyVMsDisksDisk2.VHDX"}) Storage migration of shared vhdx or vhds disks If you try to migrate a storage disk which is configured as a shared disk (either in .vhds VHD Set or .vhdx shared format) you will encounter the following blocking error and the storage migration will not be able to continue. Virtual hard disk C:ClusterStorage.vhdx cannot be moved because it is marked as shareable and shareable VHDs cannot be moved because the other VMs sharing this VHD would then have invalid configurations.
Shared disks are part of a guest WFC cluster If the shared disks to be migrated to another storage LUN are part of a Windows Failover Cluster (WFC) in a guest cluster fashion, for example in a SQL Server guest cluster configuration, then you need to carry out the following steps. - Shut down both guest cluster nodes (hosts). - Remove the shared VHDX/VHDS file from the second guest cluster node.
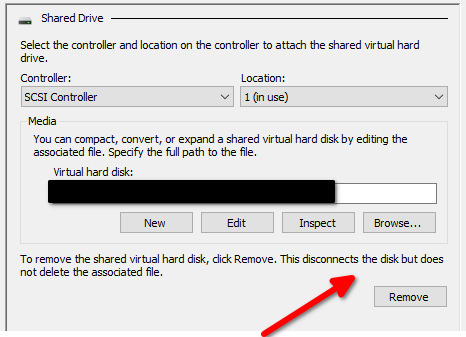
- Re-configure the VHDX/VHDS file to become a non-shared file. There is no official way to convert from VHDS to VHDX but only a workaround. Follow the steps below for this conversion from VHDS to VHDX.- Shutdown all the guest cluster VMs using the vhdx/vhds disk in question and detach the disk. - Copy/backup *.vhds and *.ahdx - Rename *.ahdx to *.vhdx - Use the Starwind V2V Converter too to convert to vhd or vhdx. - Re-attach the disk and verify functionality in your WFC cluster. - Power on the guest cluster node 1. - Perform the storage migration of the shared disks from guest cluster node 1. - Shut down node 1 again. - Re-configure the VHDX/VHDS file again to become a shared file and add it back to guest cluster node 2. - Power on both guest cluster nodes. Shared disks are not part of a guest WFC cluster In this case, you need to carry out the following steps. - Shut down the VM to which the shared disk in question is attached. - Remove the shared disk in question from the VM. This will detach the disk from the VM but it will not delete the actual disk file/data.
- Re-add the disk to the VM but this time choose the disk to be a non-shared disk.
- Power on the VM and perform the storage migration from the WFC console.
Sources
https://docs.microsoft.com/en-us/powershell/module/hyper-v/move-vmstorage?view=windowsserver2022-ps https://social.technet.microsoft.com/Forums/Azure/en-US/27ccf285-e5c3-4819-8f9c-82784b8ba71a/convert-vhdset-to-vhdx?forum=winserverhyperv Read the full article
#failovercluster#hyper-v#livemigration#Microsoft#Powershell#Storage#storagemigration#vhdset#vhds#vhdx#virtualmachines
0 notes
Text
Watch "Install hyper v on windows 10 - Install hyper-v on windows 10" on YouTube
Watch “Install hyper v on windows 10 – Install hyper-v on windows 10” on YouTube
View On WordPress
#enable hyper v on windows 10#enable hyper v windows 10#enable hyper-v in windows 10#how to activate hyper v in windows 10#how to disable hyper v on windows#how to enable hyper v on windows#how to enable hyper v on windows 10#how to install hyper v gui tools#how to install hyper v on windows#how to install hyper-v#How to install Hyper-V on Windows 10#hyper v virtual machine#Hyper v vs vmware#Hyper-V#hyper-v install#hyper-v windows 10#install docker on a hyper-v virtual mac#install hyper v on windows 10#install hyper-v on windows 10 home#install hyper-v on windows 10 powershell#install hyper-v on windows 10 pro#virtual machine
0 notes
Text
Install HyperV and Configure vSwitch on Windows Server 2022 with PowerShell
Microsoft’s hardware virtualisation product is Hyper-V. It enables the creation of a software version of a computer known as a virtual machine. Each virtual machine functions as a complete computer. In this article, we shall discuss how to Install HyperV and Configure vSwitch on Windows Server 2022 with PowerShell. Please see “vSwitches: How to delete Virtual Switches from Hyper-V“, Enable HyperV…

View On WordPress
#Hyper V#hyperV#HyperV VMs#Hypervisor#Microsoft Windows#Type 1 Hypervisor#Windows#Windows Server#Windows Server 2022
0 notes
Text
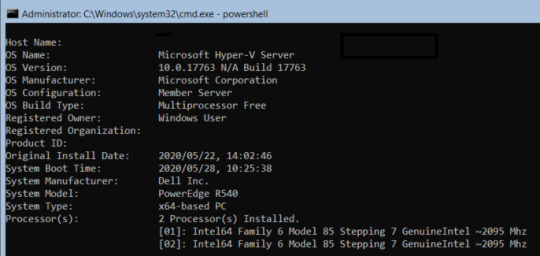
How to Get Hyper-V CPU Information in Windows PowerShell
How to Get Hyper-V CPU Information in Windows PowerShell
When asked to bring up a new server in an existing environment, I have to check three things to make sure we can handle it. The CPU available vs CPU assigned. RAM Available vs RAM Assigned and Storage Capacity. Now if you are working in a big environment you probably have the tools to spin up new machines quickly and easily but for Small Business environments this happens manually a lot of the…
View On WordPress
0 notes
Text
How to Remove a Hyper-V VM Snapshot using PowerShell
How to Remove a Hyper-V VM Snapshot using PowerShell
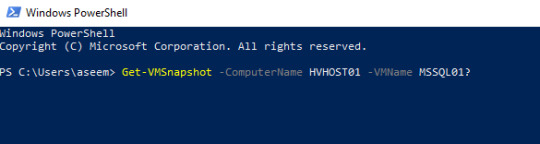
Hi everyone! I recently worked on a Hyper-V cluster and ran into a rather weird issue where I am unable to remove VM checkpoints from Hyper-V Manager.
Now I’m sure most of you will tell who is using the UI? We are all PowerShell gods who grab the bull by the horn and automate our path in life.
Well that’s true and we all have fun with the user interface from time to time. Well the fix is…
View On WordPress
0 notes
Text
Instando o WSL
A Microsoft disponibiliza duas versões do seu Subsistema Windows para Linux, a primeira versão (WSL 1) funciona como um interpretador de binários Linux, o bacana é que funciona de forma nativa dentro do Windows, inclusive utilizando portas e serviços do sistema. Já a segunda versão (WSL 2), é a atual, mais indicada e utilizada, pois tem uma performance muito melhor, utiliza conexão NAT e Hyper-V criando uma conexão local dentro da própria máquina, mas tudo funciona e os dois sistemas conversam perfeitamente.
Vamos a instalação:
WSL 1
- Abra o menu iniciar e busque “Ativar ou desativar recursos do Windows”; - Na janela que abrir procure por “Subsistema do Windows para Linux” e ative a opção; - Uma janela deve abrir para ativar o serviço, após a conclusão, reinicie a máquina; - Agora é só ir na Microsoft Store e instalar a distribuição de preferência (recomendo instalar o Ubuntu, para instalar clique aqui); - Após a instalação, abra o aplicativo Ubuntu e aguarde iniciar o subsistema; - Insira usuário, senha e seja feliz; - Se quiser um terminal mais útil e funcional, instale o Windows Terminal (para instalar clique aqui);
WSL 2
- Abra o PowerShell como administrador e execute: dism.exe /online /enable-feature /featurename:Microsoft-Windows-Subsystem-Linux /all /norestart
- Após concluir, reinicie o computador;
- Abra o PowerShell como administrador e execute: dism.exe /online /enable-feature /featurename:VirtualMachinePlatform /all /norestart
- Após concluir, reinicie o computador;
Agora defina o WSL 2 como sua versão padrão
- Instale este .msi (para instalar clique aqui);
- Após a instalação, abra o PowerShell como administrador e execute: wsl --set-default-version 2
- Após concluir, reinicie o computador;
- Agora é só ir na Microsoft Store e instalar a distribuição de preferência (recomendo instalar o Ubuntu, para instalar clique aqui); - Após a instalação, abra o aplicativo Ubuntu e aguarde iniciar o subsistema; - Insira usuário, senha e seja feliz; - Se quiser um terminal mais útil e funcional, instale o Windows Terminal (para instalar clique aqui);
2 notes
·
View notes
Link
IBM Spectrum Protect Overview IBM Spectrum Protect Overview announce: 12/12/17 eGA: 12/15/17 Server and OC OC Reporting Minimum length password HSM HSM for Windows – filter driver HSM for Windows – threshold migration HSM for Power Linux LE HSM dsmmigundelete updates Spectrum Protect for Virtual Environments Data Protection for VMware Parallelism Improved Configuration Wizard in Legacy GUI Improved Configuration & Validation of Data Movers in vSphere Web GUI Hyper-V New Configuration Wizard Hyper-V Graphical User Interface for Operation & Scheduling Hyper-V Powershell Module Spectrum Protect for ERP Parallel Redo Log Copy Performance MAX_VERSIONS Parameter Now Supported in HANA Spectrum Protect Snapshot - UNIX Snapshot Unix – Oracle Single Administrative User Support Snapshot Unix – Oracle Configuration and Migration Wizards Snapshot Unix – Oracle 12c R2 Support Dynamic Target Adapter for SVC Incremental Snapshots Spectrum Protect for Databases / Snapshot - SQL SQL Server 2017 Support SQL Server VSS Restore to Alternate Instance/Server SQL Server Database Cloning Footnote goes here
1 note
·
View note
Text
How to Put CVMs and hosts in maintenance mode
How to Put CVMs and hosts in maintenance mode
HOW TO PUT CVMS AND HOSTS IN MAINTENANCE MODE
We must know how to place cvms and hosts in maintenance mode for any network or cluster related activity such as ram upgrade, firmware upgrade of single nodes.
For CVMS and Nutanix AHV, VMware ESXi, Citrix Xen we can place with SSH and for Microsoft Hyper-V Use PowerShell or failover cluster manager.
Nutanix CVM (Controller Virtual Machine)
View On WordPress
3 notes
·
View notes
Quote
Comment essayer Windows 10X Comment essayer Windows 10X Avez-vous entendu parler de la nouvelle version de Windows 10? Voici comment le tester maintenant. Qu'est-ce que Windows 10X? Windows 10X est la nouvelle version du système d'exploitation Windows 10, conçue principalement pour les appareils à deux écrans. Le lancement de cet OS est actuellement prévu en 2021. Comment tester Windows 10X windows-10x-home Vous pouvez essayer Windows 10X à l'aide de l'émulateur Microsoft. Il convient de noter que le travail sur la version continue et que les assemblages préliminaires sont principalement destinés à permettre aux développeurs de commencer à assurer la compatibilité des applications. Vous pouvez rencontrer des erreurs, des plantages et d'autres problèmes. 1. Installation de l'émulateur Microsoft Vous devez d'abord installer Microsoft Emulator. Il est gratuit et disponible sur le Microsoft Store. Téléchargement: Microsoft Emulator pour Windows 10 2. Téléchargez l'image de l'émulateur Windows 10X windows-10x-emulateur Ouvrez maintenant l'émulateur Microsoft. Il commencera automatiquement à rechercher une nouvelle version du système d'exploitation dans le Microsoft Store. Sélectionnez la dernière version, puis cliquez sur Installer. Vous devrez entrer le mot de passe de votre compte Microsoft pour confirmer le téléchargement et accepter le CLUF. Ensuite, l'image Windows 10X démarre. 3. Vérifiez si Hyper-V est installé Avant de démarrer Windows 10X, assured-vous d'avoir installé et exécuté Windows Hyper-V. Ouvrez une invite de commande avec des privilèges d'administrateur. Entrez ensuite la commande suivante: systeminfo.exe Faites défiler vers le bas et recherchez la section Configuration requise pour Hyper-V. Si les exigences disent «Oui», vous pouvez passer à la section suivante 4. Si les exigences disent «non», lisez la suite. Ouvrez PowerShell avec des privilèges d'administrateur. Entrez la commande: DISM / En ligne / Enable-Feature / All / FeatureName: Microsoft-Hyper-V Une fois la commande terminée, redémarrez le système. Une fois votre système redémarré, vous trouverez des options pour Hyper-V dans le menu Démarrer.
http://lemonde01net.blogspot.com/2020/07/windows-10x-comment-essayer.html
1 note
·
View note